A finished metal cylinder reveals little about its beginnings. Its smooth walls and hollow interior give no obvious clue that it started as a small, solid piece of metal. For healthcare equipment manufacturers, that transformation deserves attention because production decisions influence component weight, assembly requirements, material use, and purchasing costs.
Impact extrusion forms metal under pressure, creating the main shape of a component in a brief press stroke. The speed is impressive, but it tells only part of the story. Material preparation, tooling, finishing, and inspection all contribute to the result. These ten stages explain the process and its practical significance for healthcare businesses.
1. Start With the Component’s Intended Job
For equipment buyers researching “how does extrusion work,” the useful starting point is the component drawing. Engineers need to understand the required shape, material, dimensions, and assembly connections before choosing a manufacturing route.
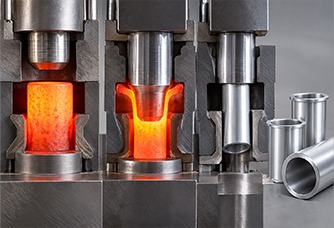
Reviewing how the impact extrusion process works helps connect those requirements to the forming operation. A press drives a punch against a prepared metal slug inside a die, directing the material into the intended shape.
The early discussion should distinguish essential features from preferences. A dimension that controls a mating connection deserves different attention from an exterior surface with generous clearance. Engineers and purchasing teams benefit from agreeing on those priorities before tooling begins. This also gives suppliers a clearer basis for explaining costs and identifying features that require additional processing.
2. Select and Prepare the Metal Slug
The starting piece is called a slug, blank, or puck. Its material and volume must suit the component being formed. A consistent starting blank helps establish a repeatable process, while the alloy determines how the material responds to deformation and later treatment.
Preparation sometimes includes annealing, which softens the material for forming. The sequence depends on the alloy and manufacturing plan. Published impact extrusion methods describe preparing and lubricating aluminum slugs before the forming operation.
For a healthcare equipment project, material selection belongs in the initial specification review. Buyers should identify the intended operating environment and performance requirements rather than assuming that any aluminum grade will serve the same purpose. Material substitutions deserve engineering review even when the unfinished pieces look alike.
3. Lubricate the Slug Before Forming
Lubrication helps manage friction as metal moves against the tooling. During forming, the contact surfaces experience substantial pressure and movement. Poor lubrication conditions affect surface quality and place additional demands on the punch.
Research into backward extrusion identifies lubrication and friction at the punch interface as significant factors in both forming and punch withdrawal. This preparation step rarely receives attention in a purchasing conversation, yet it belongs in a supplier’s process controls. A useful review covers:
The specified lubricant and application method.
Consistency of coverage before the slug enters the press.
The cleaning steps included after forming.
Lubrication serves the manufacturing operation. Final cleanliness remains a separate requirement that the customer and supplier need to define for the actual component.
4. Position the Slug Inside the Die
The lubricated slug is placed in the die cavity. The die provides the surrounding geometry, while the punch approaches along its intended path. Together, these tools determine where the metal can move.
At this stage, understanding “how does extrusion work” means looking beyond the press itself. Tool geometry and the relationship between the punch and die control the forming space. The prepared slug must sit correctly before the stroke begins.
For procurement teams, the practical issue is repeatability. An approved sample establishes an initial result. Production planning must also address how tooling condition, setup, and incoming material will be controlled across subsequent orders. Those discussions are especially useful when the same component will support several equipment models or a long production program.
5. Apply the Forming Stroke
A mechanical or hydraulic press supplies the force that drives the punch into the slug. Under that pressure, the solid metal deforms and moves through the available space. The tooling directs the movement into the component’s main geometry. The term single stroke describes this forming action. It does not mean that the finished product emerges ready for installation, testing, or shipment.
That distinction matters when comparing supplier quotations. A quote for an impacted blank covers a different scope from a quote for a machined, finished, and inspected component. Purchasing teams should compare equivalent deliverables and identify which operations remain after the press cycle. Otherwise, a low initial piece price leaves an incomplete picture of the production budget.
6. Follow the Metal Forward
In forward impact extrusion, material travels in the same general direction as the punch. It passes through an opening in the die, which defines the emerging section. The punch fits closely enough within the cavity to prevent the backward flow associated with reverse impacting.
For readers comparing methods, “how does extrusion works” becomes easier to understand when direction is the reference point. Forward describes the material’s movement relative to the applied punch force.
It also helps explain why a supplier needs a drawing before recommending a process. The opening, material distribution, and required geometry have to work together. Selecting a method solely because it has a fast forming cycle overlooks the design work that makes that cycle useful.
7. Watch Reverse Extrusion Build the Hollow Section
Reverse impact extrusion sends the metal in the opposite direction. As the punch advances, the material flows back around it. The punch occupies the interior space while the surrounding tooling helps establish the outside profile.
This movement produces the hollow, cup shaped geometry associated with many impact extruded components. The space between the tools governs the formed wall region.
The healthcare connection is practical. Aluminum impact extrusions have applications in medical cylinders, respiratory products, and sieve bed components. A body formed from one piece also avoids an assembly joint at that location. That is a design advantage, but finished equipment still needs its specified connections, finishing, and verification. The forming method alone does not establish suitability for a particular medical application.
8. Combine Flow Directions for More Complex Shapes
Combination impact extrusion permits material to move both forward through a die opening and backward around the punch. The two movements occur within the same forming operation, allowing geometry that draws on both approaches.
Choosing this method begins with the part’s requirements. Engineers evaluate the desired features and determine whether combining flow directions makes manufacturing sense.
The business discussion should stay equally specific. A more involved shape is useful when it reduces work elsewhere, supports assembly, or meets a necessary design requirement. Complexity without a clear purpose adds another issue to manage. Buyers should request an explanation of which features the stroke produces and which features remain for subsequent operations.
9. Bring the Near Net Shape to Its Final Specification
Near net shape means the formed component approaches its intended final geometry. It does not promise that every feature or surface is complete. Depending on the design, subsequent work includes:
Machining connection details and other precise features.
Heat treatment to achieve specified material properties.
Polishing or applying the selected surface finish.
Completing the required assembly operations.
These services are established parts of the broader impact extrusion manufacturing sequence.
For a purchasing manager asking “how does extrusion work,” this is where the production explanation becomes a cost discussion. The relevant comparison includes tooling, forming, secondary work, inspection, and delivery. Reducing material removal has value, but the finished component’s total requirements determine whether the route suits the project.
10. Verify the Result and Plan for Repeat Orders
The final review should connect the supplied component to the agreed drawing and purchasing specification. Buyers need clear acceptance criteria rather than a general assurance that the process is precise.
A practical handoff identifies critical dimensions, required documentation, surface expectations, and responsibility for any application specific testing. It should also establish how proposed material, tooling, or process changes will be communicated. These details give both parties a reference when a later order raises a question.
Impact extrusion’s central action is brief, but its business value depends on the surrounding work. Careful preparation puts the right material into the tooling. Controlled forming creates the main shape. Finishing and verification complete the agreed component. Understanding that sequence helps healthcare equipment businesses assess suppliers, compare realistic costs, and plan production with fewer unanswered questions.







We use cookies to ensure you get the best experience on our website. Read more...